Easy and Fool Proof Madeira Cake Recipe for Absolute Beginners
After many attempts - yes, many attempts - I can share with you an easy, fool-proof, recipe for how to make a madeira cake. This simple, All-In-One madeira cake recipe makes a gorgeous, moist Madeira cake. It’s suitable for even an absolute beginner! Good luck – I know you can do it! Take your time, there’s no rush. But most importantly have fun doing it.
ALL-IN-ONE-METHOD
The all-in-one method means that all the ingredients are mixed together at the same time, This is the quickest and easiest way to make a madeira cake that still gives really good results.
This method is not ideal for light and airy cakes, such as Victoria sandwich sponges or Angel cakes.
WHAT IS A MADEIRA CAKE?
I would say that a Madeira cake is described as a ‘dense’ sponge cake.
Funnily enough a Madeira cake is not from Madeira nor is it made with Madeira.
Many years ago, it was served with fortified Madeira wine from Portugal – hence the name given Madeira Cake. It is a gorgeous sponge that can be served on its own, without any filling or decorations, with a cuppa tea or coffee and at any time of the day! My son loves it.
WHAT IS A DENSE SPONGE?
It’s a close-textured, rich kind of sponge cake. It’s the perfect type of sponge for making celebration cakes.
Why? Because it holds itself well for decorating in buttercream, chocolate ganache, fondant icing and/or decorations etc. Compare this with a Victoria Sandwich Sponge, for example, which is light and airy. A light, fluffy sponge would probably collapse or lose its shape under the weight of fondant and decorations.
So, let’s get started…
PREPARING & TIDYING UP AS YOU GO ALONG
I remember when I first started baking, Oh My Gosh! What a mess I had made in the kitchen and I got so flustered and stressed. Not to mention the shock my hubby had when he came home from work. He found every surface in the kitchen was covered in used baking equipment all piled up, with spills everywhere! Then getting even more flustered as there wasn’t any room to make dinner!
Oh, how I have learnt since then. So now, I’m a great believer in getting everything ready before you start to make a cake, and of course tidying up as I go along. This also prevents me from making silly mistakes. Baking should be fun and enjoyable, not stressful.
A FEW THINGS TO DO BEFORE YOU GET BAKING
- Wash hands
- Start with a clean & tidy kitchen. Clean down your surface with antibacterial wipes or spray
- Have your tools/equipment out and ready
- Have your recipe and instructions in front of you
EQUIPMENT NEEDED
- 8″ round 4” deep Cake Pan/Tin
- Grease proof lining
- Medium size bowl
- Electric hand whisk or food mixer
- Spatula
- Teaspoon
- Long bread knife or cake saw
- Newspaper
- String
- Sieve
- Weighing scales
- Scissors
There are many different types of weighing scales and ways to weigh your ingredients.
I would suggest that you buy scales that you do not need to reset each time you lift off and put back the scale dish.
I’ve made the mistake of weighing the bowl and ingredients together – it all went very wrong!
I always use 4-inch-deep cake pan/tins when baking celebration cakes rather than the 3-inch-deep pan/tins. Why? Well, the result will be that your sponge will be taller and it will look more impressive than if you were to use a 3-inch-deep pan/tin.
If you only have a 3-inch-Deep cake pan then please follow the Basic Madeira Cake-8-inch round 3-inch-deep pan/tin. Why? Because the ingredient amounts are different. Please don’t wing it by trying to halve your recipes or double up etc. as this is a sure way for things to go wrong. Baking is a science thing!
Ingredients for 8″ round x 4″ deep pan
- 400g / 14 oz Caster Sugar (fine or superfine grade)
- 400g / 14 oz unsalted baking spread i.e. Lurpack, Clover, Utterly Butterly
- 450g / 15.9 oz Plain (all-purpose flour) sieve the flour before adding into bowl
- 2 teaspoons Baking Powder (sieve baking powder before adding to bowl)
- 7 Free Range Eggs – size 3 or large (room temperature)
- 25g / 1 oz spread
Ingredients for 8″ round x 3″ deep pan
- 275g / 9.7 oz Caster Sugar (fine or superfine grade)
- 275g / 9.7 oz unsalted baking spread i.e. Lurpack, Clover, Utterly Butterly
- 350g / 12.3 oz Plain (all-purpose flour) sieve the flour before adding into bowl
- 1 ½ teaspoons Baking Powder (sieve baking powder before adding to bowl)
- 5 Free Range Eggs – size 3 or large (room temperature)
- 20g / .7 oz spread
If you can, try to use baking spread or spreadable butter rather than margarine. Baking spread or spreadable butter gives a much better flavour and texture to the cake.
It’s important to use room temperature eggs (not straight out of the fridge) when baking. Room temperature eggs disperse more easily and evenly in the batter. Since eggs form an important part in the structure of a cake, even distribution is key for good texture. Room temperature eggs bind more easily to other ingredients
INSTRUCTIONS
Step 1
Ensure your oven rack is moved to the 2nd lowest position from the bottom. If you have one, put your oven thermometer in the oven.
Heat the oven to 160C, 150C fan assist oven, gas 3.
An oven thermometer is a really inexpensive piece of equipment, but worth its weight in gold.
All ovens cook at different temperatures and if you want great cakes, you need to know you’re baking at the right temperature.
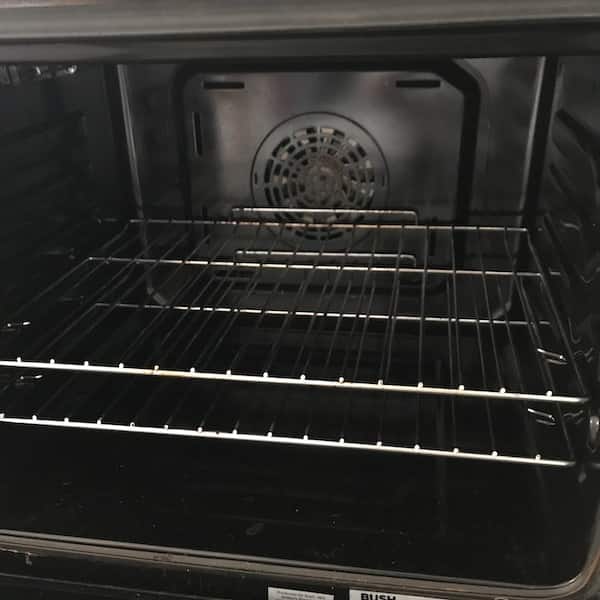
Step 1 - put the shelf 2nd from the bottom and add your oven thermometer
Step 2
Grease the tin with the spread – use your fingers to smear it generously over the bottom and the sides of the tin.
Line the cake tin with greaseproof paper, both bottom and sides.
HOW TO PREPARE A CAKE TIN / PAN
Use your fingers to smear the insides and the bottom of the tin with baking spread, or, use baking spray if you have it.
Place the pan/tin onto the greaseproof paper.
With a pencil, draw a circle around the outside of the tin.
Cut the circle just inside your pencil line and place it inside the tin. Smooth it down with your fingers to remove any air bubbles.
Cut some greaseproof paper into a strip 4 inches high.
Cut the strip into 2 pieces and place them around the inside of your tin/pan.
Smooth the paper down with your fingers to remove any air bubbles. The whole of the tin should now be lined with paper.
Grease the pan
Cut a circle of greaseproof paper and pop it in the base of the pan
Cut strips of greaseproof paper to line the pan sides
Place the cut strips onto the sides of the pan
Smooth the paper down with your fingers to remove any air bubbles
Step 3
If you have a cake belt, soak your cake belt in cold water and then wring out excess water.
Wrap your pan/tin with a cake belt.
If you don’t have a cake belt, no problem! You can use newspaper. Take a couple of sheets of newspaper and fold them into a long rectangle shape, around 4 inches high. Place the newspaper around the tin/pan and use string to tie around and secure the newspaper.
Step 4
Sieve the flour and baking powder into the mixing bowl.
Tip – Always try to sieve the dry ingredients i.e., flour, raising agents, cocoa, icing sugar etc before adding it to your mixture. Sifting aerates the flour. This benefits the baking in many ways. It results in a lighter and airy texture and it also reduces any clumps of flour or raising agents in the batter.
Add all of the remaining ingredients into the mixing bowl
Step 5
Use your hand or electric whisk to mix the ingredients together for 1-2 minutes or until the mixture is light and glossy. Don’t over-mix or you’ll knock out all the air.
Step 6
Use a silicone spatula to scrape all of the mixture (batter) into your prepared cake pan/tin.
When all the mixture (batter) has been poured into the cake tin /pan, use a tablespoon to spread out the mixture evenly.
If you make a small well/hole in the middle, approx. 2cm/ 1” in diameter, this helps to prevent a mound rising in the middle of the cake.
Add batter to pan
Make a well in the middle
Make a well in the middle (side view)
Please don’t slam down or tap the cake pan/tin on the worktop to get the mixture level, as this knocks the air out of the mixture.
We need the air!
Step 7
- The oven should be at correct temperature (if you remembered to set it before you started!)
- Place your cake pan/tin on the 2nd shelf from the bottom of the oven. Ideally the cake pan/tin should be in the middle of the oven.
Cooking time for 8″ x 4″ cake
Set your timer. Either use the oven timer or a manual one. You’ll need to bake it for 1 ¾ to 2 hours; it takes this long because of the amount of eggs. However, you’ll need to check to see if it is ready after 1 ½ hours – all ovens cook at different rates!
Cooking time for 8″ x 3″ cake
Set your timer. Either use the oven timer or a manual one. You’ll need to bake it for 1 ½ to 1 ¾ hours; it takes this long because of the amount of eggs. However, you’ll need to check to see if it is ready after 1 1/4 hours – all ovens cook at different rates!
HOW TO KNOW WHEN A SPONGE CAKE IS COOKED?
There are several things to look for when deciding if a Madeira sponge is ready.
Once your cake nears the end of the baking time, peek through the oven window. There are three quick-check tests we can do.
TEST 1: You’re looking to see if:
- the edges have pulled away from the Cake Pan/Tin. When the cake is done, the sides will have pulled away from the Cake Pan/Tin slightly. The edges of the cake are the first part to set and become fully baked. They shrink inward as the rest of the cake bakes.
- the cake is a golden brown colour.
If you see that the edges of the cake have pulled away from the sides of the tin and the colour is golden brown, it’s time for the next test.
TEST 2: You’ll need to open the oven door, but it’s important not to have the door open long or you’ll lose all the heat. Open the oven and quickly, gently press on the centre of the sponge with 2 fingers to see if it springs back. If your fingers leave indents, your sponge isn’t quite done baking. Close the oven door and bake for a further 5-10 minutes before checking it again.
If the sponge sprang back when you pressed it, you can do the final test
TEST 3: We will check it with a skewer (or barbeque/kebab stick if you don’t have a skewer).
Open the oven door. No need to get the cake out. Insert the Skewer in the centre of the cake and push it down to the middle of the sponge. Pull it straight out. If the skewer comes out clean, it’s done. If it comes out gummy or with crumbs clinging to it, the cake needs more time in the oven. Reset your time for another 10 mins.
This does take some practice. But if you use the above points along with sticking to the exact weight of ingredients, recipe and instructions, then there’s less chance of your sponge going wrong.
Whatever you do, DON’T open the door to have a sneak peek or test the cake until it’s near its baking end time and you notice the above points. Early peeking will cause your sponge to sink or collapse. I’ve been there!
Step 8
- Once the cake is fully baked, place the pan/tin somewhere to cool, and remove the newspaper / cake belt.
- Cool for about 30 mins or until the pan/tin is cool enough to touch.
- Turn out your sponge onto a cooling rack or chopping board to cool completely
CONCLUSION
The lovely thing about the Madeira cake is that it is so versatile. It can be eaten as it is, or made with various flavours and colours. It can be an excellent first step for the base of a celebration cake, covered and decorated it in various ways i.e. glaze, fondant icing, buttercream, chocolate ganache or with some beautiful fresh flowers.
Your Madeira cake will keep in an air-tight container in the cupboard or on your worktop for at least a week. No need to refrigerate.
But I doubt it will last that long as it tastes so delicious!
Enjoy!